Vacuum Sealer Tips
Vacuum sealer tips for one of the smartest investments you will ever make. I have a confession to make: I love my vacuum sealer. I love that satisfying "pop" when my jars seal properly, and I love a nice, neat package of chicken, vacuum sealed and ready for the freezer. Thanks to my handy vacuum sealer, I can buy large quantities of meat as well as flour, pasta, beans, rice, you name it, and store them for years.
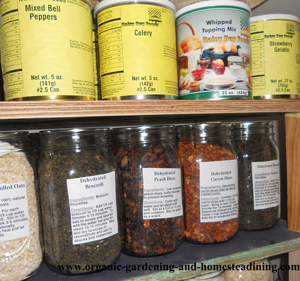
My vacuum sealer lets me store all kinds of dried goods.

Our master bedroom has a large bathroom with one of those garden tubs in it. We never used the tub, so a few years ago, my handy husband converted the tub into an extra closet. He covered the tub with flooring and built walls and shelves, so I now have a bathroom pantry where I store a lot of my dried foods. You have to use a step stool to get into the closet, but otherwise it's great. You would think the moisture from the shower would have wreaked havoc with my dried goods by now, but it never has, and I thank the clever person who invented the vacuum sealer for that.
But there are a few tricks I've learned over the years to properly store food, so with no further ado, here are my vacuum sealer tips:
Vacuum Sealer Tips
Store Your Dried Goods in Glass Jars
You can purchase separately either a wide-mouth or regular-mouth attachment to allow you to seal your dried goods in glass canning jars. I absolutely recommend storing your dried milk, rolled oats and other dried goods in glass jars rather than the plastic vacuum sealer bags. I learned the hard way that over time, your expensive investment of dried milk will develop a "plastic" taste from the vacuum sealer bags.
Not only that, dehydrated vegetables don't do well in plastic bags. My dehydrated carrots and peaches ended up glued together in a hard clump. I had to use a soft mallet to break them apart.
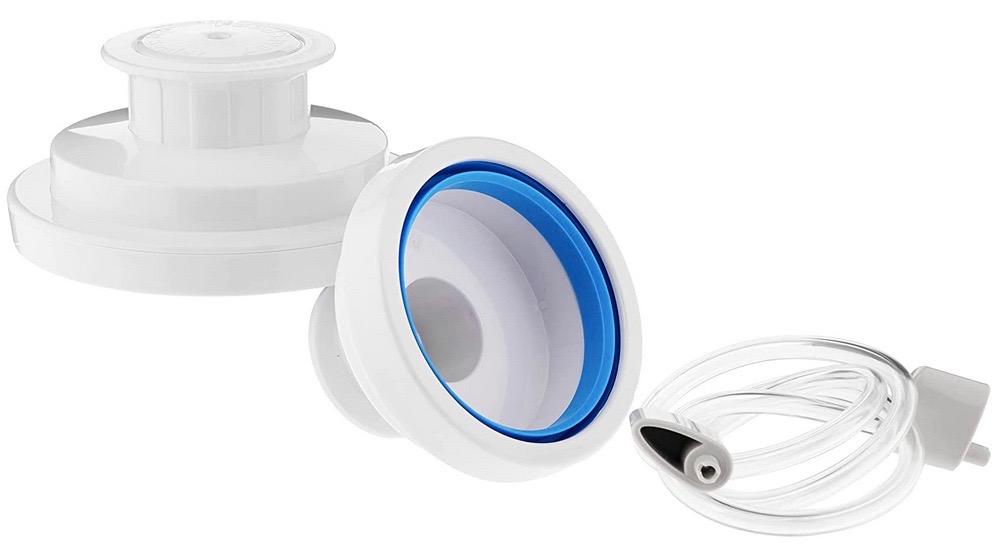
I prefer a wide-mouth jar sealer because they're easier to use. You can find one here.
Then, to top it all off, mice got into our house and chewed holes in the corners of some of the bags. Eww. That's why canning jars are always better for storing your dehydrated food. The mice won't even be able to smell dried goods let alone eat them.
Canning Lids Are Reusable
Unlike with canning, the lids can be used again and again, if you open them carefully. Run a spoon along the ridge of the jar until it is tight between the rim and the lid. Then gently twist your spoon sideways to break the seal.
Be sure to wash and dry your lids before you reseal your food. Otherwise it might not seal properly. I will also say, that although I have both the regular-mouth and wide-mouth attachments, the wide-mouth works much better and is far easier to get a seal. I just never could get the regular sized attachment to work properly, but the wide mouth works just fine. I prefer wide-mouth jars anyway, because they are far easier to clean.
Vacuum Sealer Tips
Save Your Bags For the Freezer
Vacuum sealer bags work great for the freezer for freezing meat, fruit and vegetables. To keep your fruits or vegetables from turning into mush when they're being sealed, freeze them overnight on a tray and then vacuum seal them.
Vacuum Sealer Tips
Rotate your food
There is nothing more depressing than finding meat in your freezer that is older than two years. I have cooked and eaten meat that went past the recommended date and it worked just fine, but it's better not to. Rotating your food is the best way to avoid this. Put the older things on the top if you have a chest freezer or toward the front if you have an upright freezer.
Can't Afford a Vacuum Sealer?
Don’t worry; you’ll be fine.
At the time of this writing, a vacuum sealer costs about sixty dollars and goes up from there. Not everyone has that kind of money. I have managed to keep wheat and dehydrated foods for a long time in gallon-sized freezer bags, but you'll need to place the bags in a container of some sort to keep the mice away. Place your food in a freezer bag, squeeze out the air and then place the bags in a 5 gallon plastic container. New, never-used paint buckets work well for this and are easy to obtain. You can also get empty icing containers from grocery store bakers.

In Abducted, guilt and ghosts plague Calista Evans, the result of a desperate act she committed as a teenager...(read more)

In Abductions, millions have vanished, and the aliens are taking credit, claiming these "disruptive" persons were removed for re-education and the betterment of planet Earth...(read more)

For months, Phil Banowski scoured the bowels of the earth, desperate to free his daughter, Markey, from alien clutches...(read more).

Alexander St. James just made the biggest mistake of his life. He moved his wife, Lydia, and their daughter, Cass, into a deluxe underground bunker to ride out the chaos topside. Too late, Alexander realized he made a pact with the devil (read more).

Recent Articles
-
Books About the Rapture Help When Worrying About the Future
Jun 19, 25 04:06 PM
 Books about the rapture can give us hope in this uncertain time that we live in. Here's my recommendation.
 -
What Does Electrotherapy Do?
Sep 08, 22 04:05 PM
 What does electrotherapy do? Look at it as a safer way to manage either temporary or chronic pain.
 -
Why Pine Needle Tea Is a Must Have in Your Preparedness Pantry
Sep 01, 22 06:02 PM
 Pine needle tea is a must have in your preparedness pantry. It's the best way to eliminate any harmful spike proteins you've been exposed to.

New! Comments
Have your say about what you just read! Leave me a comment in the box below.