Rendering Lard
Rendering lard is an easy, low-cost way to have your own healthy cooking oil. Once you realize the health benefits of lard, you'll love making lard for frying and baking.
What is Lard?
Lard is pig fat that has been cooked slowly over a medium heat until all the fat melts away from the remaining bits of meat.
The fat is then poured through a strainer, and the end result is pure lard.
And unlike the lard you purchase at the supermarket, home rendered lard
hasn't been hydrogenated, a process where the fat is treated chemically
to ensure a longer shelf life.

Lard was the cooking fat of choice for centuries, but things changed for the worse in 1910 when Proctor and Gamble were looking to market a new byproduct they had developed out of cottonseed oil. They marketed it as Crisco, and by calling it an "all vegetable shortening," they made lard sound like death fat by comparison. Nothing could have been further from the truth.
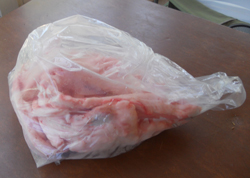
Lard rendering begins by purchasing pig fat from your local meat processor or butcher.
Pure, un-hydrogenated lard is loaded with Omega-3 fatty acids that are actually good for your heart.
The health benefits of lard has been a secret that has been suppressed for way too long. The real truth is, that "all vegetable shortening" is the fat that is bad for you.
Cottonseed oil has been linked to thyroid disorders, infertility, and one of the leading killers in the United States today - heart disease.
So if you're looking for a healthy way to make pies and biscuits along
with the best fried chicken out there, rendering lard is a great way to
go.
It's also extremely affordable. I recently bought five pounds of pig fat from my local meat processor for $2.25.
After rendering, I ended up with at least four pounds of pure lard at a cost of about 56 cents per pound.
That's a huge savings compared to vegetable shortening (about $1.86 per pound) or hydrogenated lard (more than $3 per pound).
Rendering Lard - Getting Started
Here's what you need:
- Pig Fat
- Cheesecloth
- Stainless Steel Strainer
- Large Pot or Dutch Oven
- Wooden stick or spoon
You can find pig fat at a local meat processor or butcher.
Get a large pot and add half a cup of water to the pot.
Then cut the pig fat into small cubes and heat it over medium heat for several hours.
Rendering lard took me more than four hours to complete, so while it wasn't labor intensive, it did take some time.
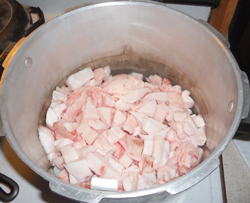
Start by cutting up the pig fat into small cubes and place them in a pot with half a cup of water.
A Word of Caution
The melting fat is extremely hot and can cause serious burns if it lands on your skin. Just as you should be carefully when frying bacon or chicken, you should take care when rendering lard.
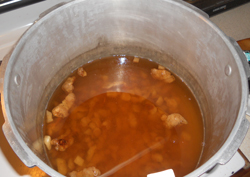
You are about finished making lard when all of the cracklings sink to the bottom of the pot.
The only real danger I ran into was when I took out a large piece of fat to cut it up and make it smaller before adding it back to the pot. I dropped one of the pieces in, and some of the fat splashed out.
Fortunately, I didn't burn myself, but it was a reminder to gently lower
the fat back into the pot rather than drop it in.
Stir the fat every few minutes until the fat turns to liquid.
The process will take about two hours, so be patient. After about an hour and a half, you will start to hear a popping sound. This is the last bits of air escaping from the fat. Continue stirring the meat until all the fat has completely melted. When all the cracklings (the remaining bits of meat) have sunk to the bottom of the pot, you are almost finished rendering lard.
Finishing Making Lard
Finish making lard by allowing the fat to cool for a little bit.
Then line a strainer with cheesecloth and carefully pour the fat through the cheesecloth and strainer.
The remaining bits of meat are cracklings.
You can eat them as a snack (very good!) or add them to soups, cooking beans, or cornbreads for extra flavor.
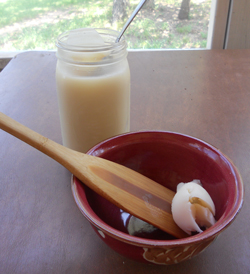
Pour your lard into quart jars. It will last for three months in the refrigerator or up to a year in the freezer.
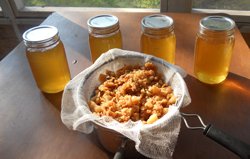
Fresh lard, along with the cracklings. The lard is golden and clear when it is first strained, but once it cools, it turns white.
Lard is good to use in frying, making pie crusts and baking breads.

In Abducted, guilt and ghosts plague Calista Evans, the result of a desperate act she committed as a teenager...(read more)

In Abductions, millions have vanished, and the aliens are taking credit, claiming these "disruptive" persons were removed for re-education and the betterment of planet Earth...(read more)

For months, Phil Banowski scoured the bowels of the earth, desperate to free his daughter, Markey, from alien clutches...(read more).

Alexander St. James just made the biggest mistake of his life. He moved his wife, Lydia, and their daughter, Cass, into a deluxe underground bunker to ride out the chaos topside. Too late, Alexander realized he made a pact with the devil (read more).

Recent Articles
-
Books About the Rapture Help When Worrying About the Future
Jun 19, 25 04:06 PM
 Books about the rapture can give us hope in this uncertain time that we live in. Here's my recommendation.
 -
What Does Electrotherapy Do?
Sep 08, 22 04:05 PM
 What does electrotherapy do? Look at it as a safer way to manage either temporary or chronic pain.
 -
Why Pine Needle Tea Is a Must Have in Your Preparedness Pantry
Sep 01, 22 06:02 PM
 Pine needle tea is a must have in your preparedness pantry. It's the best way to eliminate any harmful spike proteins you've been exposed to.

New! Comments
Have your say about what you just read! Leave me a comment in the box below.