Beekeeping Basics
for Early Spring
These beekeeping basics will ensure your bees will survive the end of winter and produce plenty of honey for you this spring and summer.
Let's face it; bees are a lot more fragile than they used to be.
An older beekeeper once told me that beekeeping used to be a breeze, but no more.
Now there's colony collapse disorder, wild weather and all kinds of parasites that will attack your sweet little bugs.
So keep these tips in mind when working with your hive.
Order Your Bees by the End of February
If you plan on ordering bees, be sure to place your order by the end of February. Most suppliers of bees have a limited amount of nucs available for sale each year. By ordering early, you can ensure you'll be able to keep bees this year.

Beekeeping Basics for
If You Already Have Bees
If you already have a hive of bees, one of the crucial basics is to make sure your bees don't starve before plants start producing pollen. Early spring is a wonderful time to be a beekeeper and a perilous time for your bees.
Hungry Bees are Unhappy Bees
Most likely, your bees have been shut up all winter and are running low on food. As the temperatures in your area get warmer they will be coming out of the hive and looking for nectar - and could die quickly of starvation unless they find something to eat.
Get your spring beekeeping off to a good start by preparing a syrup for them, an essential part of your beekeeping basics.
Making Syrup for Your Bees
Bring a gallon of water to a full boil and add five pounds of sugar. Stir until the sugar is completely dissolved and allow it to cool. Fill a gallon chicken waterer with the your syrup and then add gravel or small rocks to the watering tray so your bees don't drown.
Set the waterer about 100 feet away from your hives.
Don't set it right in front of your hive, because it will encourage robber bees to come. By setting your syrup far enough away to prevent robbing while still providing a source of nectar, you will strengthen your hive for the coming productive months.
If you don't have a chicken waterer, get a large plastic jar with a screw-cap lid.
Drill a hole near the top of the jar that is one and a quarter-inch wide.
Fill the jar with your syrup, screw the lid back on and then set your jar, upside down on a large cookie sheet.
Place small rocks or gravel on the cookie sheet to again ensure your bees don't drown.
Provide Warmth for Your Hive
Cover the top of your hive with black tar paper to help absorb warmth from the sun and naturally heat the hive. (Remove it when the weather gets warmer).
Or you can cover the top of your hives with straw to help provide insulation and keep the warmth in. Just cover the top of the hives, and not the entrance so your bees can still leave and reenter the hive.
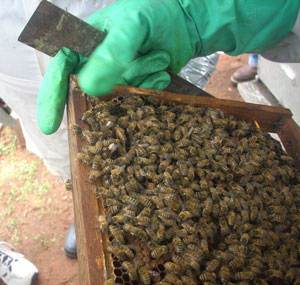
Inspecting Your Hive in Early Spring
Make sure the temperatures are at least 70 degrees Fahrenheit or warmer before your inspect your bees.
Otherwise, your bees will get chilled and could die.
Other Helpful Tips
The video below, provided by A Future With Bees, also provides lots of tips to carry your bees through winter.

In Abducted, guilt and ghosts plague Calista Evans, the result of a desperate act she committed as a teenager...(read more)

In Abductions, millions have vanished, and the aliens are taking credit, claiming these "disruptive" persons were removed for re-education and the betterment of planet Earth...(read more)

For months, Phil Banowski scoured the bowels of the earth, desperate to free his daughter, Markey, from alien clutches...(read more).

Alexander St. James just made the biggest mistake of his life. He moved his wife, Lydia, and their daughter, Cass, into a deluxe underground bunker to ride out the chaos topside. Too late, Alexander realized he made a pact with the devil (read more).

Recent Articles
-
Books About the Rapture Help When Worrying About the Future
Jun 19, 25 04:06 PM
 Books about the rapture can give us hope in this uncertain time that we live in. Here's my recommendation.
 -
What Does Electrotherapy Do?
Sep 08, 22 04:05 PM
 What does electrotherapy do? Look at it as a safer way to manage either temporary or chronic pain.
 -
Why Pine Needle Tea Is a Must Have in Your Preparedness Pantry
Sep 01, 22 06:02 PM
 Pine needle tea is a must have in your preparedness pantry. It's the best way to eliminate any harmful spike proteins you've been exposed to.

New! Comments
Have your say about what you just read! Leave me a comment in the box below.